
Do-It-Yourself Mini Split units have become very popular since they are a good alternative to high-cost HVAC installations.
They come with almost everything needed except tools and electrical wiring to a panel.
There are many units available, from small 9000 BTU units to large 36000 BTU units.
Heat pump units such as Pioneer both heat and cool making them good to use all year long.
Pioneer is one such popular DIY Mini Split manufacturer with several different sized units.
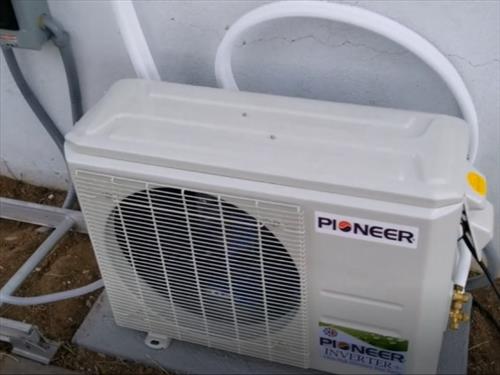
I recently installed a Pioneer 12000 BTU 230 Volt unit, and I thought I would share how I installed the unit.
A video is also posted at the bottom of the page of the installation.
The unit will come with lots of information, such as the user manual and installation instructions.
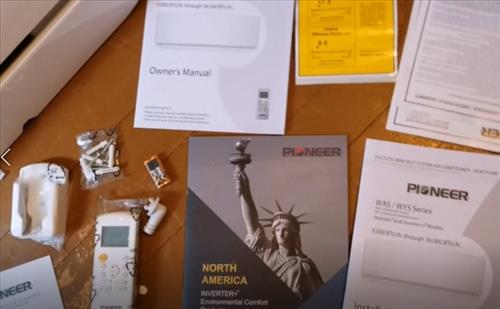
Be sure to follow the installation manual that comes with your unit.
There are some tools that will be needed, such as a Vacuum Pump and Manifold Gauges.
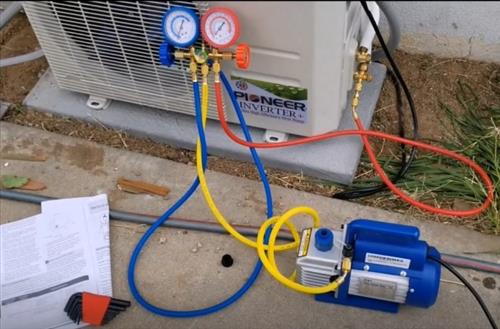
There are many low-cost vacuum pumps and gauges; I bought some budget ones for the installation.
Some other basic tools will also be needed, such as a drill, screwdrivers, and wrenches.
Most Mini Split systems will need a 5/16″ Female Coupler to 1/4″ Male Flare to connect the manifold gauges to the unit.
Here is one on Amazon
PIONEER Air Conditioner Ductless Mini Split System Charging Vacuum Port Adapter, Converts New R410a Style 5/16 SAE Service Ports to Accept Older 1/4 SAE Gauge Hoses.
A 3-inch hole saw bit is also needed to drill a hole for the line set and wiring to go between the units.
How To Install Pioneer 12000 BTU 230 Volts Ductless Mini Split
- The first step is to layout where the unit will be located and run the electrical.
- A pad will be needed to set the outside condensing unit. It needs a flat solid surface that is level to sit on.
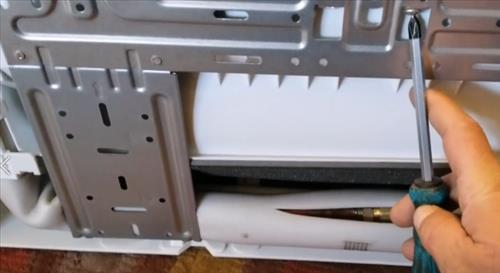
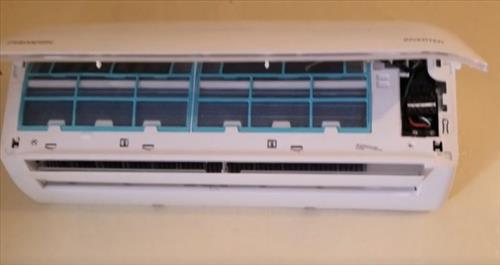
- Next, the inside unit will need to be mounted onto a wall.
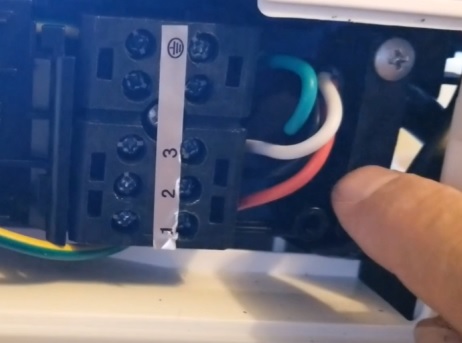
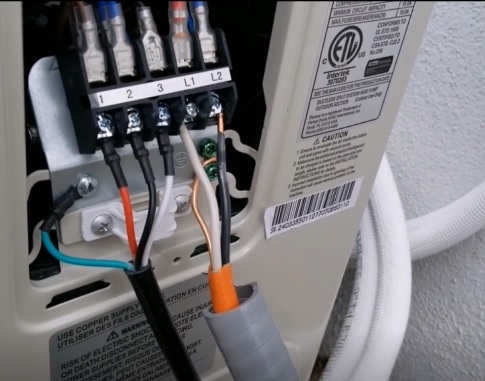
- Hook the wiring harness to the inside unit, which is labeled 1,2,3, and ground.
- Feed the line set and wiring out the hole and set the unit on the mounting bracket.
- Next, the copper line set needs to be screwed together.
- Hook up the wiring harness to the outside unit.
- Once everything is installed, the line set will need to be vacuumed out with a Vacuum pump.
- Release the refrigerant into the system.
- Once the refrigerant is in the system, power on the unit, and it is ready to be tested.
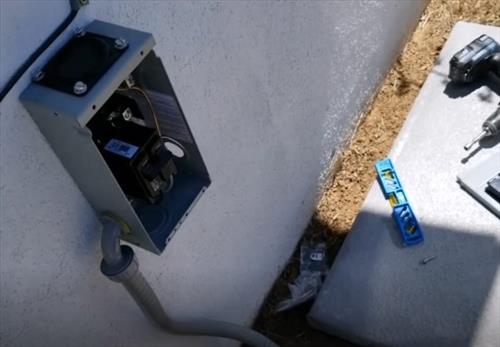
Always follow the manual that comes with your unit for the wire Gauge and breaker Amps.
The unit I received needed to be on a 20 AMP breaker which can be run to an electrical panel or on its own box.
Most HVAC companies will install a disconnect box which simply breaks the flow of electricity when work is needed on the unit.
Personally, I install a 20 AMP breaker close to the unit but this is a personal preference as long as it is on a 20 AMP breaker at the panel.
If the outside location already has concrete it can simply be set on it.
If there is no pad one can be bought or a small cement pad can be poured.
Small pads are low-cost items that can be purchased and what I use for example this one on Amazon.
Mini Split Pad on Amazon
Ideal-Air 728184 2 x 16 x 36 Cement Equipment Pad
Whichever way a pad is set up be sure it is level and set the outside unit on top of it.
There are a few things that need to be done before it can be mounted.
First, the mounting bracket will need to be screwed onto the wall and level.

The mounting bracket is on the back of the inside unit held in place with a Philips screw.
Be sure to mount the bracket on a good stud, so the unit is secure.
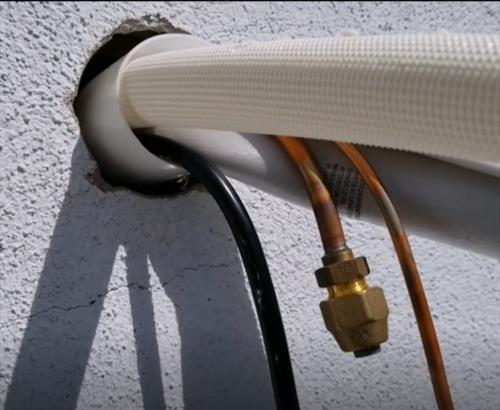
A hole will need to be drilled to run the line-set and wires to the outside unit.
Look at the back of the unit for where the line-set and wiring stick out for where the hole will need to be drilled.
The instructions will also show the location and size of the hole needed through the wall.
I used a 3-inch hole saw to drill an opening for the refrigerant line and wiring to go to the outside unit.
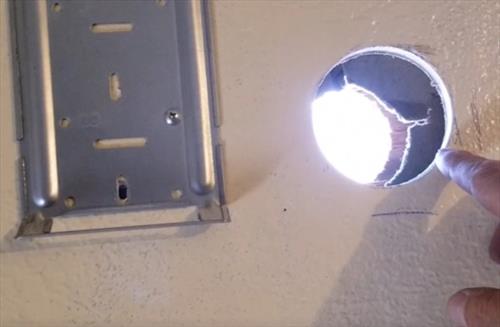
Be sure to follow the schematics that come in the manual or on the inside door for your unit.
The connectors are located under the front panel under a pull out on the right side.
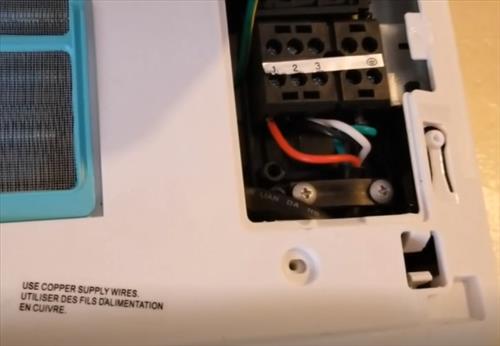
The wire harness will need to be fed in from the back.
One problem I had was the wire color codes were not exactly the same as the wiring harness sent to me.
This was not much of a problem as the inside, and outside units are labeled 1-2-3 and ground. If this happens to you, simply be sure the wire color match inside and out. For example, Red would be connected to the connector labeled “1” inside and outside.
The wires, line set, and drain line all need to be fed out of the 3-inch hole and the unit mounted on the wall bracket.
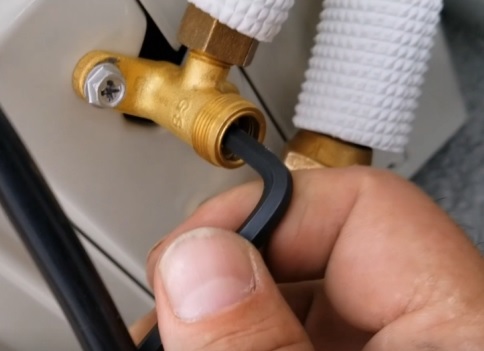
Be careful with the copper line set as it cannot be kinked or will block the flow of refrigerant.
There is a plastic protector that slides into the hole and protects the wiring and copper lines if needed.
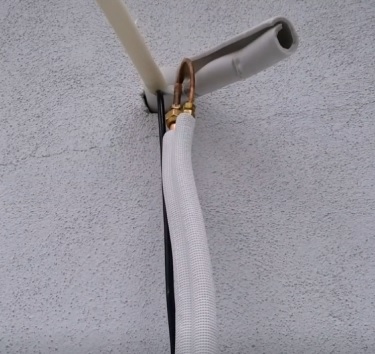
The main thing when installing the line-set is to not kink the copper and screw it together carefully so as not to strip the bolt threads.
This is easy enough; simply take your time by rolling out the copper line-set and hand tightening the connections before using a wrench.
Screw the nuts on by hand carefully, making sure not to strip the threads. Once hand tight, use a wrench to tighten them up and get a good seal.
Again follow the schematic that comes with the unit.
Be sure the connectors labeled 1-2-3 and ground match the inside wall unit.
The L1 and L2 go the circuit breaker for power.
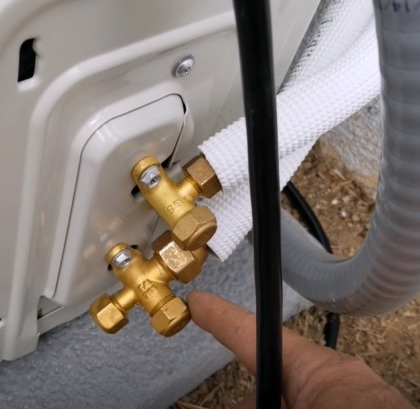
Using manifold gauges and a pump hook up to the low-side port. It is the only service port on the unit.
Let the vacuum pump run for 15-20 minutes, pulling a vacuum. After 15-20 minutes, turn off the vacuum pump and watch the manifold gauge pressure.
For example, here, it is hooked to the Red Gauge, and the pressure is negative with the dial under the zero marker.
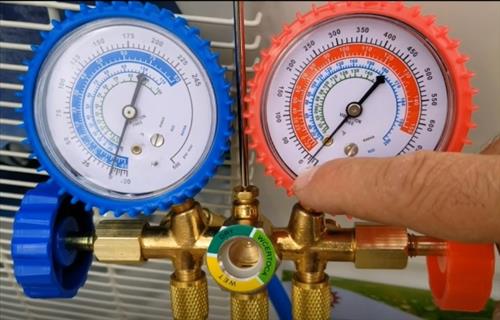
It should hold a negative pressure; if not, there is a leak that needs to be fixed.
Let it sit for at least 20-30 minutes or more, and be sure it holds a negative pressure.
Once the line-set has been tested for any leaks and has a vacuum, the refrigerant can be released.
Both the high and low side will need to be released. This is done by removing the caps and using an Allen key, turning them to the left counter-clockwise.
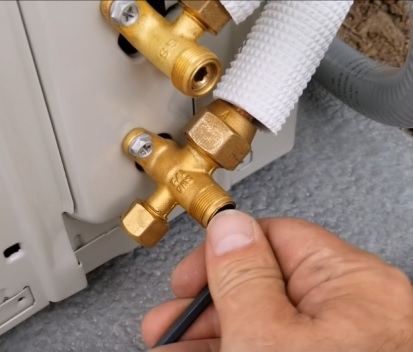
They will need a few turns for the valve to come fully open.
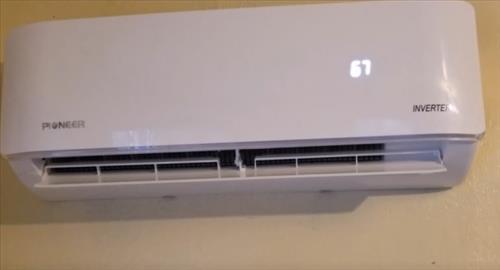
Power on the unit using the remote control. The right side shows the temperature when the unit is turned on.
Summary
Installing the Pioneer Ductless Mini Split was not that difficult and falls into a handy person Do-it-yourself category.
Of course, if you have never done any basic construction or electrical wiring, be sure to call a professional.
If you decide to install a unit yourself, be sure to read the instructions 2-3 times before starting.
Plan the install over a 1-2 day period and take your time. While it can be installed quickly, it is best to go slow.
It took me 3-4 hours to install everything.
Every install will be a bit different since electrical box locations, walls, and other things can change a layout.
Video Instructions
I want to take delar in bahrain can you explain.made where.all ton unit you have
I have an 18000 BTU *dual zone condenser that I would like to repurpose for another location. Can I use an 18000 BTU head on this unit on just one zone?
Doesn’t the condenser need to be 12″ from the wall? Less would be better for me, but I am concerned the efficiency will drop. How close can I get and have it work?
Hi there,
For starters, thank you for making such an easy to follow video. I never guessed that there were this many little things to factor when installing these units.
My question is I have a 12000 BTU 230V Pioneer mini split with a 25′ line set and I think I will be using just about every foot of it. Do I need to add more refrigerant? If so, how do I do that, where do I do that, and how much do I put in?
Thank you again.
I have a 9000 BTU Pioneer WYS Series unit and would like to know if I need to bolt down the outdoor compressor to my concrete pad or just let the unit sit on the pad? Unit is level on pads now, just want to know if it needs to be secured with expansion bolts, etc..
Its not necessary as they don’t move but guess it couldn’t hurt
What pressure (and temperature) should the lines be when testing heat and cool mode?
I bought one of these, Pioneer WAS/WYS 9000 but with a 33′ lineset, is the book correct that I need to add 16oz for additional foot, or in this case 17′ x 16oz= 272 ozs , that seems like a awful lot. ( “Additional refrigerant/Liquid side 1/4″/per additional feet:0.16oz/ft”). the reason that I ask is that in researching I thought that I had read elsewhere that you needed an additional ounce for each additional 6′.
0.16oz X 17′ = 2.72 oz of refrigerant
Thanks for the great how to article. I just did a Climate-Right mini split, it comes fully charged, both units, and you install the line set and that opens a valve. I’m thinking about trying the Pioneer next because it’s a bit less expensive and has a better trouble shooting and install manual.
We are considering installing a mini split. We would bit the outdoor unit on our enclosed balcony at one end. We would remove the windows so it would be well ventilated on two sides. Then we would build a cover over one side with a top and insulated.
This area is 32” deep x 35” high x 37” wide enclosed on 2 sides and the top but full open on 2 sides and protected from the sun as the balcony is west facing.
From my research this should allow the system to work properly with plenty of ventilation. We could then actually use the balcony and get rid of the thru the wall a/c that vents to the balcony making it unusable.
Do you see any issues with the enclosure and proper ventilation?
What kind of refrigerant did you use? Puron or reon?
They come filed with R410a
Hi
I had to cut my hole on the other side – left – not right . I am wondering if there is any special consideration for this when connecting the outside line set?
Thanks
I read through the instructions many times because of my install, it was limited space
using either side shoes in the booklet that it is ok to do.
Did you bend the copper tubing by hand or did you use a tool for this?
Did you have to flare the copper tubing before making the connections?
With respect to the vacuum pump process my understanding is the low pressure (blue hose and blue gauge) side gets evacuated. So I believe the high pressure valve should be closed but the low pressure side is opened while the pump is running. Once you are satisfied that the pressure is holding steady and there are no leaks pioneer instructs you to open the refrigerant line a quarter turn for 5 seconds then close the refrigerant. Now the gauges should show a positive reading. One should again observe the gauge to make sure there is no leak. Once certain there is no leak the refrigerant can be totally released
I bent the tubing by hand. It is soft and easily bendable.
The copper ends came with a flare so I used them.
You are correct about the vacuum pump process. The blue side is for low pressure. I should have used the low side but was only testing for a vacuum and leaks.
I assume you did not need to flare the copper tubing simply because you did not cut the tubing for a custom fit. So for example if a unit comes with 16 feet of line set and you only need 10 feet you can avoid flaring by coiling up the excess. But if you want a custom fit you need to cut the copper tubing to size, then place the flaring nut over the tubing and then flare the copper before you can attach it to the outside unit. After this you can evacuate the unit. I have a question about the evacuation process. After running the pump for a while and you are ready to test for leaks do you shut off the pump and close the valve on the manifold?
Yes, after leaving the pump run for 15-30 minutes the pump and valve are shut off. The gauge will show negative pressure, after sitting for 20-30 minutes if it goes back up to 0 there is a leak and it needs to be fixed. If it holds the vacuum there is no leaks and the refrigerant can be released.
If your don’t shorten the lines, you won’t need to re-flare them. Yes, after evacuating the system, turn off the pump and close the valve on the manifold. it should hold the vacuum. I let it set for several hours. I think the directions say when you release the refrigerant just do a little then check to make sure it hold. I also soaped the connections. then take the gauges off and release the rest. look on YouTube and read the directions. Pioneer also has excellent customer service. give them a call if you have any questions. also, you can download the manual and read the install instructions before you buy the product. then call customer service if you have more questions.
Saludos a todos, acabo de ayudar a un amigo a instalar un Pioneer WYT inverter 18 BTU de 230v y no prende, he verificado todo varias veces y nada, si pueden darme alguna idea que me pueda ayudar se lo agradeceria
Even Parker Davis admits that the Wifi connectivity does not work well. I wonder if a conventional communicating thermostat like a Honeywell T9 or an Ecobee can be mated to these units for far better control??
We have Cielo Home wifi adapter on a Pioneer Mini-Split and it has worked very well for over 2 years now.
great video.
I’m installing a 18000btu unit and the the lines coming from the indoor unit have pressure behind
the caps is this normal?
Thanks Earl
The indoor units are sometimes shipped pressurized with Nitrogen. As long as it is the indoor wall unit it can be let loose. The refrigerant is in the outdoor unit that everything needs to be sealed before opening the valves.
Is there a distance min max between the inside and outside units ?
No there is no set distance, technically the amount of refrigerant that comes in the unit accounts for the 16 foot line-set, but this should not make much difference. The line-set can be left rolled up in a loop close to the unit or if the line-set is shortened the unit can be checked with gauges to be sure it is operating correctly.
Tech at Pioneer said that I didn’t need to worry if I shortened the 16′. The amount of refrigerant would be fine.
The max distance is most likely 50 feet for the compressor motor. The unit comes as stated pre-charged for the expectation of a 16 foot lineset. If you use a shorter or long lineset you will have to either extract coolant for shorter linesets, or add additional coolant for longer linesets. Adding coolant is pretty easy, albeit maybe expensive for a single job. You buy a can or tank of the refrigerant and using the gauge set you add more into the system. To extract coolant is easy peasy for a tech as he would have an empty bottle to capture the gas, again using the gauge set to connect the bottle. If you use anything but the 16 foot lineset I would get a tech in to help you with that final part.
Also when you boil the system down, or vacuum it down (water will boil under vacuum and be extracted from the system) vac it down, mark it on the gauge with tape, and leave it overnight. It shouldn’t move at all if its done right. Otherwise start looking for your leak. 9 times out of 10 its a shoddy braze job on the lines from the factory or errant dirt in the flared fittings
I am getting ready to install one of these 1200BTU WYS012GMFI19RL You did not state the model # of yours. There was a 17seer but now they are 19seer IE the 19rl
Anyhow i was looking up the wiring and breaker requirements for both units it says 15amp max breaker
You put a 20amp with with 10g wire. I think 20amp needs 12g wire
Anyhow your breaker is over sized should be 15amp
The unit I received was also a 19 SEER unit even though Amazon had it listed as a 17 SEER. Guess they need to update their listing. I installed the 12000 BTU 230 Volt model which the instructions called for a 20 AMP breaker. I could have used 12 Gauge wire but had the larger 10 gauge from another project so used it. Wire gauge can be larger but not smaller. If you install a unit let us know how it goes.
Can you explain the vacuum pump step in a little better detail? Do you just unhook the pump, screw the cap back on and then charge the lines? Or is there another step that I’m missing. I am going to be installing the 9k BTU 120v today
Here is a video I did installing a Senville Mini Split which I showed the steps better. It starts at around 13 minutes into the video. https://www.youtube.com/watch?v=Dg-w2uAsEJE
I have the exact same question. Hope we can get an answer ASAP.
The valve to the vacuum pump is shut off on the gauges and refrigerant opened letting it into the system. Disconnect the vacuum hose line after letting in refrigerant. When disconnecting this will let a small bit of refrigerant out not allowing any air back into the system.